QuickBooks Inventory Software
Other Resources
Please note: Due to the complexities involved in forecasting this feature is still being enhanced. By design this tool is stand alone in the sense that it will not have any affect on your data so it can be tested without fear of inadvertent modification to live data being made. Any and all feedback is greatly appreciated as we try to build the forecasting into a world class tool.
All Orders now has a tool that takes your sales forecast and generates a production, purchasing and inventory plan.
You create a new forecast from the Purchasing menu (Purchasing --> New Forecast). Like other record type in All Orders, the forecast also has a list. Open the list and double click a forecast to open it or under the list menu on the list click Add New.
Setting Up A New Forecast
After opening the forecast screen the fist step is to import the starting
data for the forecast. You will need to locate a copy of the forecast
import template and begin filling it in. By default the template will
be located in the All Orders program files directory (C:\Program Files\NumberCruncher\All
Orders\Import) and will be named Forecast.xls. Follow the instructions
in the template and specify a list of items and then either a set of customer/ship
to addresses or locations which you want to forecast for. Then list all
of the dates that you want to forecast for. While any valid date can be
entered, the system will fit it into either monthly or weekly intervals.
One the data has been filled in, close Excel and on the forecast screen
press the drop down arrow on the Excel button on the toolbar  and click Import. After a successful import the items and
the relevant data will be loaded onto the main grid.
and click Import. After a successful import the items and
the relevant data will be loaded onto the main grid.
Managing The Forecast

At the top of the screen the name of the forecast can be specified. The interval displays whether the forecast is being managed on a monthly or weekly basis and is set at the time of the initial import. The date range for which you want to forecast can be updated as well by changing the values in the To and From. At the top you will also find the revision # (this increments ever time the forecast is changed and saved), the ID of the forecast and the date on which it was created.
The Forecast For area allows you to drill into the quantities in the list for viewing an editing. Depending on how the forecast was initially setup different options will be available here. If the forecast was setup for specific customer and ship to addresses then you will be able to drill into specific customers and ship to addresses to forecast for them specifically. Additionally if the forecast was setup for specific locations you will be able to drill into individual location to forecast for them specifically. As an example, say I import a forecast for an item that includes forecasting of 10 units for 8/1 in location 1 and 20 units for 8/1 in location 2. If I have not drilled into any locations I will see a forecast quantity for 8/1 of 30 units and it will not be editable. If, however, under the Forecast For I select location 1 from the ship from location drop down, the list will show a forecasted quantity of 10 for 8/1 sine it is no longer totalling the quantity for both locations. In addition the quantity forecasted for that location will turn blue and can now be edited.
In addition to being able to manage the forecast data through the interface,
you can also export the data to Excel, modify it, and then import it back
in. To do this click the drop down arrow next to the Excel button on the
toolbar and then click export. Modify to your liking
and the from the same drop down click import to bring the newly modified
data back in.
Managing The Production Plan
Once the basic forecast has been setup you can begin setting up a production plan. Any items on the forecast which are assemblies will have their components broken down so the system can help determine how much of which components need to be order and when to satisfy the forecast.
To get started, from the main forecast screen drop down the Calculate
toolbar button  . The Calculate Production Demand option will
calculate how much demand there will be for production for all of the
dates entered onto the forecast. The Calculate Production Plan will calculate
how much the plan needs to be produced during the listed dates to meet
the demand. The plan will take into account outstanding factors which
demand does not, such as lead times and quantity currently in stock, to
come with quantities that are planned for production.
. The Calculate Production Demand option will
calculate how much demand there will be for production for all of the
dates entered onto the forecast. The Calculate Production Plan will calculate
how much the plan needs to be produced during the listed dates to meet
the demand. The plan will take into account outstanding factors which
demand does not, such as lead times and quantity currently in stock, to
come with quantities that are planned for production.
After calculating, drop down the View
toolbar button  and select Production Plan to view the current
Production Plan.
and select Production Plan to view the current
Production Plan.

The list of items will display the item, description, group, lead time, available, on order, and demand quantities (ending with D) and plan quantities (ending with P) for the appropriate dates. Updating the lead time will affect when production is planned to take place. Highlight selections in the Filter by Item Group and then click the Apply Filter button to filter the list of items for easier viewing.
Above the list you will see Trigger Options. These can be set to determine what will trigger the purchasing of the components on the purchasing plan. Select Reorder Point if you want to purchase components whenever Reorder Points are hit, Deficiency if you only want to purchase what you are deficient of, or hybrid to purchase using a reorder point if it is hit and then the deficiency if it is not hit or none exists. Select a Safety Stock % if you want to plan to purchase an additional percentage on top of the total units to purchase just to be safe. Enter a Max Level percentage if you never want to purchase over a certain percentage of the total units that are planned on being purchased. Now when you go to the Calculate toolbar button and calculate the purchasing plan, these setting will come into play.
Managing The Purchasing Plan
To get started, from the main forecast screen drop down the Calculate
toolbar button . The Calculate Purchasing Demand option will
calculate how much demand there will be for purchasing for all of the
dates entered onto the forecast. The Calculate Purchasing Plan will calculate
how much the plan needs to be purchased during the listed dates to meet
the demand. The plan will take into account outstanding factors which
demand does not, such as lead times and quantity currently in stock, to
come with quantities that are planned for purchasing.
After calculating, drop down the View
toolbar button and select Purchasing Plan to view the current
Purchasing Plan.
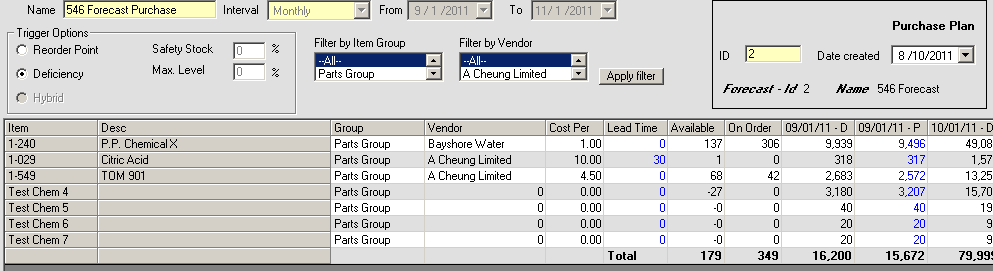
The list of items will display the item, description, group, vendor, cost per, lead time, available, on order, and demand quantities (ending with D) and plan quantities (ending with P) for the appropriate dates. Updating the lead time will affect when purchasing is planned to take place. Highlight one or more selections in the Filter by Item Group and Filter by Vendor and then click the Apply Filter button to filter the list of items for easier viewing.
Above the list you will see Trigger Options. These can be set to determine what will trigger the purchasing of the components on the purchasing plan. Select Reorder Point if you want to purchase whenever Reorder Points are hit, Deficiency if you only want to purchase what you are deficient of. Select a Safety Stock % if you want to plan to purchase an additional percentage on top of the total units to purchase just to be safe. Enter a Max Level percentage if you never want to purchase over a certain percentage of the total units that are planned on being purchased. Now when you go to the Calculate toolbar button and calculate the purchasing plan, these setting will come into play.
Managing The Inventory Status
After calculating, drop down the View
toolbar button and select Purchasing Plan to view the current
Purchasing Plan.
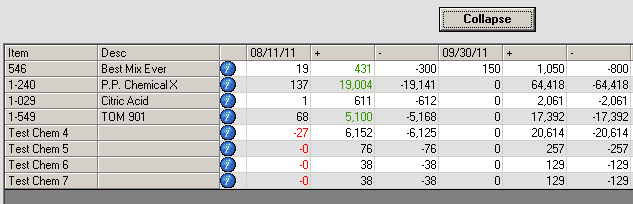
The list of items will display the item, description, an item info button, and the appropriate dates showing the rolling availability for the items for each date. Click the Expand button to view additional details. The + column will show how many additional units will becomes available during the time period according to the production and purchasing plans. The - column will show how many units will be consumed during the time period according to the production and purchasing plans. A red quantity means you will fall below the needed stock and additional purchasing will have to take place. Green means that a surplus will be created for the time period. Note that this may be caused by specifying an additional Safety Stock % when calculating the production or purchasing plans.
Generating Purchase Orders
Purchase Orders can be generated based
on the purchasing plan. This will include raw materials that will be necessary
for the production plan. Click the Create
PO button  on the toolbar to view the PO creation
screen.
on the toolbar to view the PO creation
screen.
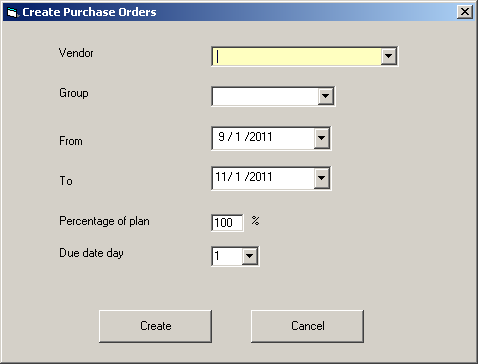
Here you can specify which Vendor you want to generate a purchase order, which group of items (if you want to purchase for only a particular group), the date range in the plan you want to purchase for, what percentage of it you want to purchase, and the day of the month you want the due date to be set to. Please note that you can generate purchase orders and leave them open until they are ready to be sent to the vendor. In addition, you can generate multiple purchase orders to break up the purchasing for large plans. For example, you might want to create ten separate purchase orders, each one for 10% of the plan, to make large volume purchasing more manageable. Click the Create button to generate the PO and Cancel if you decide not to create any POs.