The Repair Order is a new feature in All Orders that allows you to track customer returns for repair, manage and stock repairs, or ship them back to the customer, all within the Repair Order screen.
New Repair Orders and the Repair Order List can be found in the Production menu and Sales Menu. It is listed under the Sales Menu since you may sell repairs as service to your customers.
Profile Lists
First you will need to set up the Profile Lists associated with the Repair Order. These lists are located in the Lists menu under Profile Lists:
1) Problem Codes: Assign problem codes to describe why the product needs to be repaired. Two examples are Defective or Broken. You can create a pre-built list of codes to choose from when assigning the issue. Later, you can run a report that will list what problem codes were reported the most! The more specific you are with your problem codes, the better your tracking.
2) RMA Status: When the customer returns inventory parts back to you, they would, generally, receive a RMA (Return Materials Authorization). This list defines the different statuses that the repair order can be in at a certain times, primarily based on the RMA process. The 4 statuses New, Waiting Quote, In Progress, and Need Info are preset, but you can add additional statuses by selecting Save and New. Closed is a status not listed, however it is an automatic system defined status that when the RMA is finished, it will go into closed status.
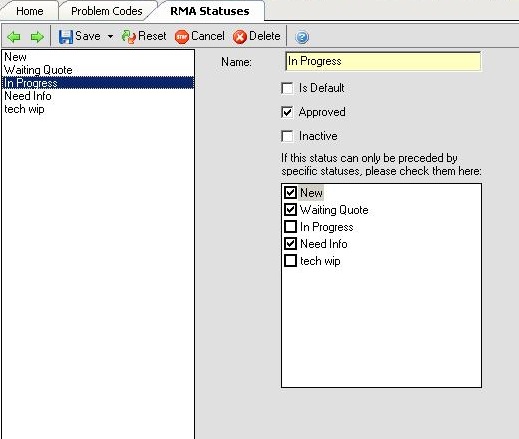
Define your RMA Status with the following options:
Is Default: If checked as the default, this status that will appear first when the repair order is created. Only one status can be the default.
Approved: If checked as approved, this status will allow you to start the repair process. For example, we will check the In Progress status as approved. On the Repair Order screen, when we change the status to In Progress, this will allow you to do the repair, such as allocate items, and close the repair.
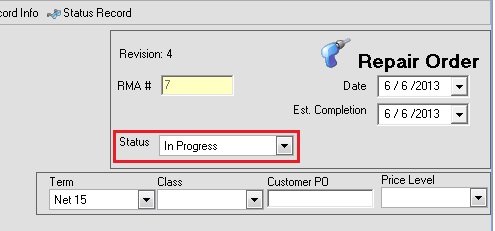
Therefore, a repair order can be created, then you can prepare an estimate for the repair prior to selecting an approved status, however, you cannot allocate inventory until there is an approved status selected.
*Note: You can create multiple statuses that are approved.
Inactive: Make an old status or an unused status inactive.
*The next box (white box in RMA Status) specifies the order sequence of your statuses. For this example, the In Progress status should always be preceded by the New, Waiting Quote, and Need Info statuses. This prevents me from skipping from New status to In Progress. I will have to go to the Need Info and Waiting Quote statuses before changing it to In Progress.
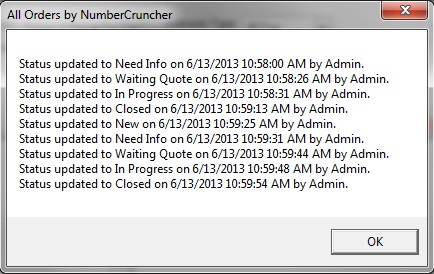
How will I know if the status has been selected on the repair order, such as the Waiting Quote status? On the mini toolbar of the Repair Order is the Status Record icon. This icon will list all of the statuses, the date and time, as well as the users that saved it.
3) RMA Type: Each repair can be listed as a different type of repair, and that may dictate how the repair will be managed. There are 4 main types of repairs:
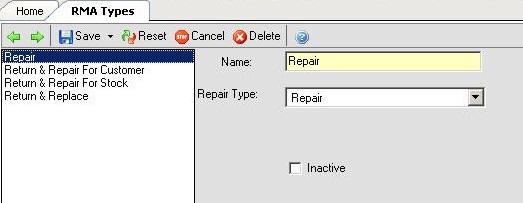
Repair: An internal repair that does not deal with customers. It is an item in stock that needs to be repaired. For example, you may purchase a refurbished item, but you want to add more parts and labor to fix it up. Using the repair order you can manage the repair, use materials and labor, and add costs to the item. There will be multiple options for dealing with the item after the repair is complete, such as leaving it in stock or writing it off.
Return & Repair For Customer: You will get a return from the customer, repair the item, and ship the same item back to the customer without ever taking true ownership of it. You will not “receive” this item into your own inventory as you would traditionally with a Customer Return, instead you are being paid for a service to repair the item and send it back to the customer; optionally, this can be a warranty return where there is no cost to the customer. Once the repair is complete the item can be “sent” back to the customer and an invoice can be generated so the customer can be billed for services performed.
Return & Repair For Stock: You will get a return for repair from the customer, but, the customer does not want the item back. This type will automatically generate a Customer Return to add the stock back in inventory. The repair process then takes place and there will be multiple options for dealing with the item after the repair is complete, such as leaving it in stock or writing it off. The customer will receive the Credit Memo for a refund.
Return & Replace: The customer returns the item, however the same item will not be shipped back to the customer. Instead a new replacement item will be sent to the customer. This type will automatically generate a Customer Return and a Sales Order. The Customer return will add the stock back into inventory and issue the customer a credit memo. The Sales Order process will begin to replace the item for the customer. The repair process then takes place and there will be multiple options for dealing with the item after the repair is complete, such as leaving it in stock or writing it off.
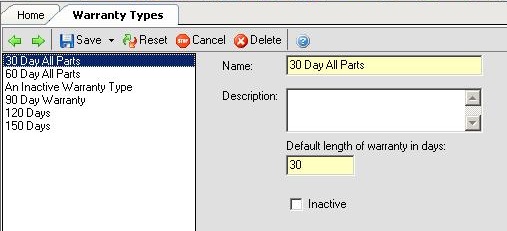
4)Warranty Types: Create your list of warranty names (Save & New) and enter the default number of days for each selection. When you ship out items, you can attach a warranty to the item.
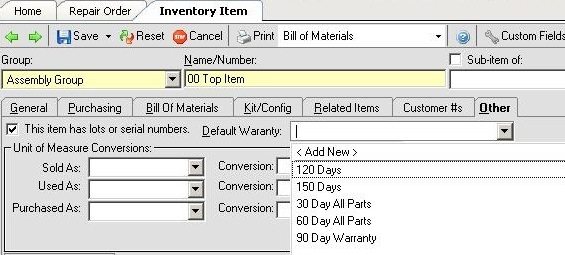
Each item can have a default warranty previously setup so that when it is shipped the associated warranty will be pre selected. This option is located in the "Other” tab on the item editing screen for any item’s that have Lot/Serial # tracking turned on.
Warranty types can only be attached to serialized items on a Ship Doc. When you select an available serialized item, on the Lot/Serial #s pop-up screen, select the warranty type from the drop-down list. You can, manually, override the number of days on the warranty field.

Preferences
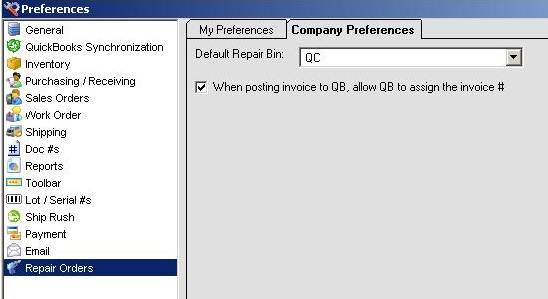
Default Bin: In the menu Company, Preferences, and Repair Orders select a Default Repair Bin. Whenever you generate customer returns for items getting repaired, those items will be placed in default bin assigned. In addition, whenever new items are added to a repair order, this is the bin they will be in during the repair process.
Invoice #s: Check the box to allow Quickbooks to determine the invoice # for any invoices created from the repair order for services rendered. Leaving this unchecked will force all invoice numbers to match the document number of the repair order.
Note: In the Location and Bin tab, you can uncheck the Available box, for the Default Repair Bin, so that it is listed as Not Available (to sell). This will store those returned items, separately, until ready to ship back to the customer, or transferred to a new bin.

Manage Users
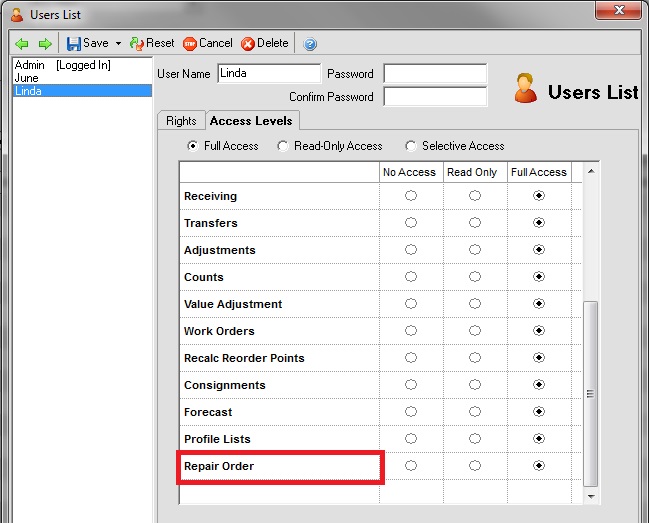
In the menu Company, and Manage Users, assign under the Access Levels tab, if the user has No Access, Read Only, or Full Access to the Repair Order.
The Repair Order Screen
1) Enter the Customer Name. After the customer is selected, set the Terms, Class, Customer PO, and Price Level, just like on the Sales Order, because you are selling a service.

*If it is an Internal Repair for an item that is currently in stock, then check the box Internal, and all of the customer related fields, i.e. Customer Name, Terms and Customer PO, will gray out. Remember for Internal, the only RMA Type that can be selected is Repair.

2) The Status is New, since I set that up as the Default.
3) The Date field is the repair order date, then enter the Estimated (Est.)Completion Date.
4) Add the Items in the To Be Repaired section. Either Select the items from the drop-down arrow, then Add Item or Scan using the barcode scanner field. If there are multiple items being repaired for one customer, list each item.

Once the item is listed:
*Select the Location and Bin where you are holding the items for repair. This is for reporting purposes to show where the items are being repaired.
* The Repair Order feature requires that you assign serial numbers. When you select a specific serial number that was shipped to a customer, and the Warranty Type was assigned, it will automatically list with its expiration date. If the warranty was expired, a message will pop up stating that it had expired.
If the item repaired has a new serial number, check the Is New Lot/Ser box, then, enter the new serial number.
*Enter 1 of the 4 RMA Types of Repair previously mentioned.
*There is a field to Assign the Employee that will be working on the repair. Assign it to each item on the order.
Once you have filled in your necessary fields, change the Status on your order. In the Example statuses modified above, the In Progress Status was preceded by the Need Info and Waiting Quote Statuses. Therefore, assign the Need Info status and save, the Waiting Quote status and save, then change to the In Progress status.
Tabs
1) General Tab: Enter a Description of the Problems in the left field and Technician Notes on the right field.

2) Codes tab: Assign the Problem Codes that were created earlier. Enter a description and/or comments.

3) Items Tab: Select the required items or services needed to complete the repair of this item. Enter the Estimated Quantity (Est. Qty) and review the Rate for each component. The Subtotal below will reflect the Est. Extended Rate. These items have not been allocated. The Repair Order form uses the Est. Qty to allow you to send estimates based on the estimates associated labor and material requirements.
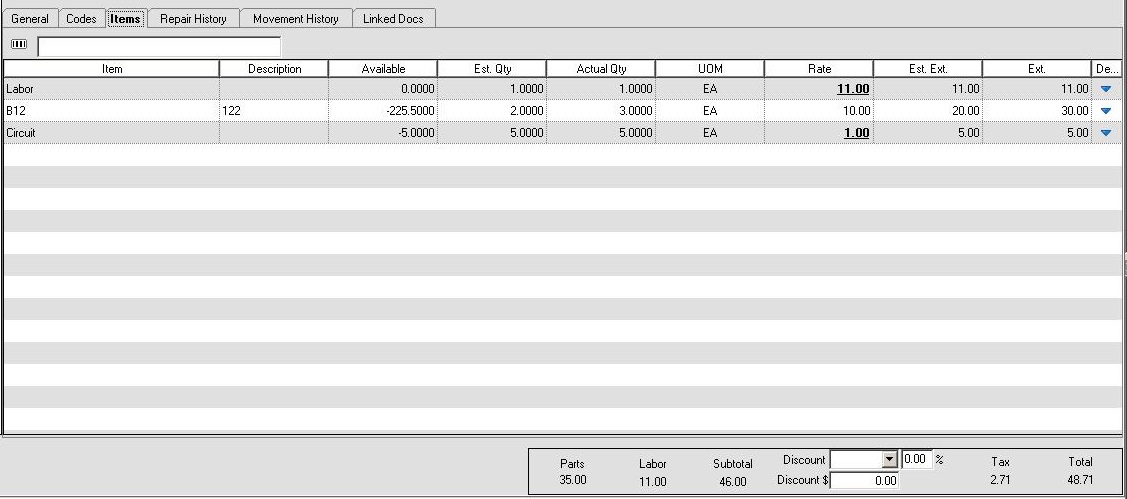
When you are ready to allocate those components, enter the quantity in the Actual Qty column. The Subtotal below will change using the Extended Rate (Ext.). Print the Repair Order Invoice to show the Actual Qty.
Note: You can create custom fields on Problem Codes lines, on the Codes tab, and Items on the Items tab, from the Details column.
4) The Repair History Tab: Information only tab that shows the history of repairs that have been made for that Item and serial number.

5) Movement History Tab: Information Only tab that shows every document, in the system, that the item and serial number is attached to, i.e. Shipping, Work Order, Transfer, etc.

6) Linked Docs Tab: Will have any documents that have been generated by this repair order. The Repair Order is, itself, a document, but it can also generate Customer Returns, Sales Orders for replacements, Vendor Returns, and Adjustment for writing inventory off.

To create these linked docs, go to the toolbar Activities, and select an option.
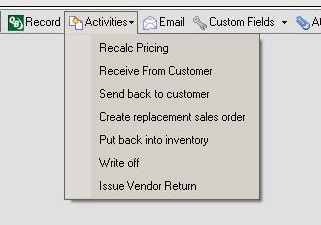
Depending on the repair type there will be different workflows for starting and managing the repair process.
A) Repair: Immediately check the Internal box to start.
B) Return & Repair For Customer: After filling in the customer information and selecting the items to repair, select Receive from Customer from the Activities toolbar drop down to show when the inventory has been received for repair. You will not see this in the inventory availability.
C) Return & Repair For Stock: Go to Activities, select Receive from Customer. This creates a Customer Return to add the stock back to inventory.
D) Return & Replace: Go to Activities, select Receive from Customer. This creates a Customer Return to add the stock back to inventory.
Note: Once the item is marked Received the date will list. Later, when you close the repair, you can to track the length of turn-around time per repair on the Reports.
Steps to close the repair order for each RMA Type of transaction:
1) Repair: To close the repair, go to Activities, and select Put back Into Inventory and the item is placed back into inventory. No additional transaction required. The repaired item will show closed with the closed date. In addition, you can Write Off (Quantity Adjustment), or Issue Vendor Return and the item will show closed with the closed date.
2) Return & Repair For Customer: To close the repair, go to Activities, and select Send back to Customer. A Returned box will pop up to show the date the repair item is sent. No additional transaction required. The repaired item will show closed with the closed date.
3) Return & Repair For Stock: To close the repair, go to Activities, and select Put back Into Inventory (will be the same Customer Return), Write Off (Quantity Adjustment), or Issue Vendor Return and the item will show closed with the closed date.
4) Return & Replace: To close the repair, first select Create Replacement Sales Order (Create New Sales Order) from Activities to begin the replacement process. Next, decide what you will do with the returned inventory; either Put back Into Inventory (will be the same Customer Return), Write Off (Quantity Adjustment), or Issue Vendor Return.
*The status of the entire order will not change to closed until all items in the order have been closed.
* Once an item is closed, to start over or to make changes, Click Reopen Item and the status will start back at New. You will have to restart the process. The system will attempt to roll back any transactions that were generated in the process of closing the repair item.

Record in QB
When the Record in QB icon is pressed, Repairs with any items that are not a Return & Repair For Customer will generate and internal bill (NC Work Order Internal), just like how a Work Order takes all cost of the additional items and add it to a finished item.
Repairs that use additional items, listed in the Items Tab, under the Return & Repair For Customer type, will generate invoices for those items that have rates and totals at the bottom. If it is within the warranty, an invoice with $0 pricing will be created.
Linked Docs, such as Customer Returns, Quantity Adjustments, and Vendor Returns must be sent to QuickBooks separately from the Repair Order. Send those transactions through that transaction’s list or by opening the transaction.
Repair Order List
When returning to an existing Repair Order, open it from the Repair Order List located in the menu Lists, and Repair Orders (Repair icon with a green check). If there are multiple items on one repair order, the order doc number will list for each item. Also, customize your list by adding or removing columns from Select Columns in the mini List drop-down list.
Reports
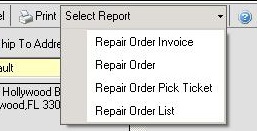
1) Repair Order: It can be modified into Estimates, RMA, and Repair Order form.
2) Repair Order Invoice: The Invoice is what gets sent to the customer once the repair is completed. With all of the actual rates and quantities used.
3) Repair Order Pick Ticket: After the customer has returned the items, this internal report is used to pull the items needed from the warehouse to use for the repair.
4) Repair Order List: A list of all repairs in report form.